

|
 |
 |
| |
Advansys Formativ gives you the power to
make GroupWise work the way you want! To help you understand what is possible
with Formativ, read on for an insight into a particular applet and how it can
help you. We discuss how it works and offer some suggestions for extending its
functionality even further.
Featured Applet:
Publish Folder
List to Microsoft Word
|
|
| |
How does this applet benefit me?
The
Publish Folder List applet provides an easy method for publishing the From,
Subject and Date information from your selected email messages to a Microsoft
Word table. The text color is changed to red if message has high priority or
light grey for low priority.
This applet is useful for a printing a
quick reference list of email for a meeting or when away from your desk. The
applet also demonstrates how Formativ makes it easy to integrate GroupWise with
an external application, such as Microsoft Word.
For additional ideas on
how the Microsoft Word integration concepts of this applet can be further
developed, see the section Taking it
Further.
How does it work?
To publish the
message list summary to Microsoft Word, you need only select the desired
messages to be listed and then run the applet. All the processing and
integration with Word happens behind the scenes and the published document will
open automatically. A progress dialog will be displayed during processing to
provide feedback to the user.
|
|
 |
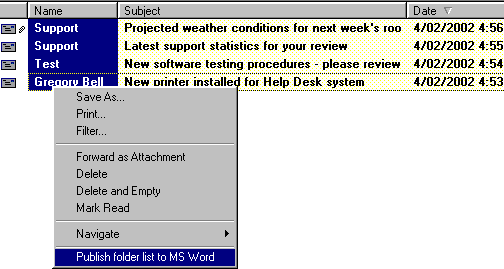
| Figure 1 -
Selected messages with right-context mouse menu displayed to run the
applet |
 |
| Figure 2 -
The resultant Word document automatically generated by the applet |
| Integrating with GroupWise |
| |
One of Formativ's key strengths is its ability to execute
applets, with point and click simplicity, from just about any toolbar, menu or
event in GroupWise - and absolutely no programming is required!
The
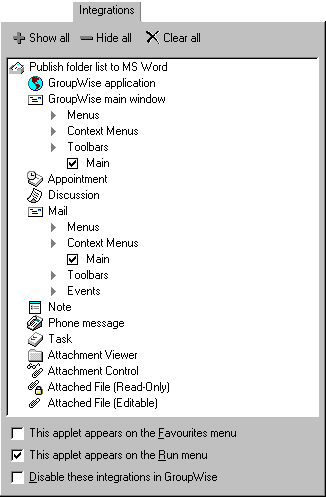
Publish Folder List applet can be easily integrated with GroupWise. Figure 3
below shows the Formativ integrations tab. Here you can see the Publish Folder
List applet has been integrated with the GroupWise main toolbar (which
creates a button for you) and the email view context menu, which can be
accessed by a right-mouse click on an email message within the folder's message
listing (Figure 1 above).
 |
| Figure 3 - Formativ
Integrations |
Take a look at the Formativ User's Guide to
see just how easy it is to integrate applets with GroupWise.
Below are
the recommended integrations you may like to try:
Main GroupWise
Toolbar
Clicking on the Publish Folder List to MS Word button will
automatically create a new Word document and publish the summary of your
selected email messages.
Email View Context Menu
The Email
View context menu is the popup menu which appears when you press the right
mouse button over an email message. Just like adding the applet to the toolbar,
the context menu provides you with quick access to your applet. |
|
Applet operation
The applet operation is
pretty straight-forward. When you run the applet, it first checks to see if you
have selected some messages from the folder's message list view and pops-up a
dialog warning you if you have not. Assuming you have selected messages, the
applet opens a new Microsoft Word document and performs preformatting, such as
setting the page margin, font, date/time and the intial table
structure.
The next step is a loop process which runs through all your
selected messages, writing the sender, subject and date/time information for
each message into a single table row. Once complete, post-processing occurs to
alter the font size and table borders.
Throughout the process a progress
dialog provides feedback until the completion dialog displays. You can then
switch to the Word document to review the
results.
Techniques
Checking for selected
messages
The first main technique used in the applet is used in the
function CheckTypeOfMessage(Client). This function uses the Client
parameter, which is the GroupWise ClientState data provided via Formativ. The
function uses this data to identify whether the user has selected one or more
valid messages for processing by the applet. If there is at least one message,
the Msg object is set to the first message data, which is later used in
the TypeHeader function to obtain the folder object set Folder =
Msg.EnclosingFolders.Item(1) and hence enables typing the folder name in
Word, .TypeText("Folder: "&Folder.Name).
Starting
Microsoft Word
The next main technique used is opening Microsoft
Word using its COM automation interface in the OpenWord function. The
Set Word = GetObject(, "Word.Application") line automatically starts
Word if it is not already running otherwise the applet will advise you that
Word is not installed on your computer.
Creating document text in
Word
With Word opened, the next step is to write the summary
information by using the TypeHeader function, then create the table
structure in CreateTable and fill each row using the TypeText
function.
Some of the Word commands used to insert and format text in
the applet are shown below.
| Set Selection = Word.Selection |
Set the Selection object
to control the Word document |
| Selection.PageSetup.RightMargin |
Set the right margin |
| Selection.Font.Name |
Set the font name, such as
"Arial" |
| Selection.Font.Bold |
Turn bold on or off |
| Selection.TypeText("text here") |
Type text into the
document at the cursor |
| Selection.TypeParagraph |
Create a new
paragraph |
The Word table commands, which create and
format the table, can be seen in the CreateTable function.
The
TypeText function includes both Word table and text processing commands.
This function gets called repeatedly until all the message summaries are
written into the table.
You will note that there are many constants
starting with wd, such as wdPageBreak = 7, in the applet. These
are standard Word VBA constants which are found in in the Word VBA
documentation or in the VB object browser in Word (Alt-F11, but only if this
Word option is installed on your computer). |
|
As is seen above, this applet prints a summary of the
selected messages in to a Microsoft Word table. You could easily extend the
applet to print other attributes of the message or change the Word text
formatting and layout to meet your needs. If desired, you could modify the
applet to print to Excel, HTML or perhaps a simple text file.
Another
applet, which builds upon some of the techniques used above, is Messages to
Word. This applet prints the complete text of the selected messages to
Word, rather than just a table summary. The Messages to Word applet
ships with Formativ Admin.
An applet can also automatically print an
active Word document by using the Word.ActiveDocument.PrintOut command.
This is a powerful feature which, when combined with the appropriate GroupWise
client integrations such as On Message Arrival, would allow you to print
incoming messages automatically via Word. |
|
Download
The Formativ Publish Folder List
to MS Word applet can be downloaded from the Formativ Solutions Download page
 . .
Installation
The applet should be
copied to the Formativ local applets folder, the default being c:\program
files\advansys\formativ\local\ (select Yes to replace the existing applet of
the same name.. see the note below) and then
restart the GroupWise client.
Distribution
For personal
use, the installation procedure described above is sufficient. To share the
same applet easily, you may also install Formativ Admin or Formativ Client so
that the Local applets folder points to a shared network folder. This is useful
for users, perhaps within a particular department, who wish to run the same
applets. For fast, flexible and secure distribution at a corporate level, it is
recommended that network and GroupWise administrators implement Formativ's
eDirectory capabilities.
Note on
disabling/enabling applet integrations
The Formativ Publish Folder
List to MS Word applet is shipped with Formativ Admin, although its
integrations are disabled. The shipping applets, apart from Multiple
Signatures, have their integrations disabled by default. This is done to allow
you to choose which Formativ applets you want to use and how you would like to
integrate them with your GroupWise client. When an applet's integrations are
disabled, it will not appear on the Formativ Run, Favorites, or any other
GroupWise menu, nor on any toolbar. The applet cannot be triggered by any
integrated GroupWise client event, such as On Message Arrival, On Open or On
Send. However, the applet can be executed manually within FormativCentral (F5
or Run button).
The download version of the applet above is already
enabled and can be copied as described above without any further actions
required (apart from restarting the GroupWise client).
To enable an
applet which installs with Formativ, start FormativCentral, highlight the
applet name on the left hand side of the screen under My Applets, then
deselect the option Disable these integrations in GroupWise. |
|
If you have any questions on this applet or you have a
need for a different applet, feel free to post a question or comment in the
Advansys Formativ Support Forums by clicking on the following
link:
Developing
Solutions with Formativ
|
|
|
 |


